Tutorial Tuesday: How to Create a Torn Paper Edge
Torn papers are a fun addition to any layout. We had a request from one of our forum members, darklighter67, to share a tutorial on creating them. I love including torn edges in my kits, but I’ll admit…I have always purchased CU Templates for them and applied my own papers. So, I stepped out of my comfort zone & decided to do a little research and learn about creating them myself for this tutorial. Just like everything else in graphic design, there are dozens of ways to do the same thing.
I looked at a lot of different methods, and finally found an interesting method showing how to apply a torn edge to a photo. I’ve decided to use this technique today, but will apply it to digital papers – it’s an easy, and very simple torn edge without a lot of extra bells or whistles. But, this will get you started & you’ll be able to create your own torn papers with unique edges. This tutorial applies to Photoshop and Photoshop Elements Users. The video that inspired me included some free brushes. Be sure to click on the video link then on SEE MORE by the text. The brushes are linked at the bottom of the text. These brushes make it SO EASY to create a realistic paper edge! So, let’s get started!
Step 1 – Create a new document in Photoshop (or PSE). Since I’m creating this to be used on a 12″ x 12″ layout, I’m starting with a canvas size of 3600 px x 1200 px at 300 ppi. We’ll crop it down when we get our torn paper created. I created it with a white background (that saves a step of filling it, but hey, if you’d rather create it transparent and fill it, that’s fine, too.) We won’t use the white layer until later. Name the white layer Background.
Step 2 – Open the paper that you want to create a torn edge on and drag it into your document. This will automatically create a new layer. Name that layer Patterned Paper. You can crop your file at this point, but I just waited until later, because I ended up cropping the file down quite a bit to fit the torn edge.

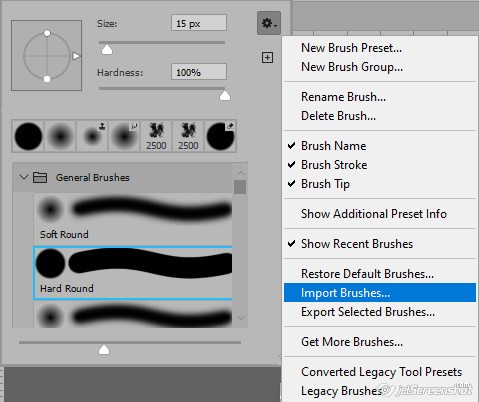
Step 3 – Download and load the torn paper brushes by Tricorn Design. Extract them from the compressed file (this one comes in .rar format, so you’ll need a program that will extract that file type). If you have other torn paper brushes that you love, then use them. See how easy I am to get along with? 🙂 To load the set of brushes to photoshop, click on your brush tool in the tools panel. Next, click on the down arrow beside the brush in the top menu bar. Click on the little “cog” on the top, right corner of the brush panel, and finally click on Import Brushes.
Step 4 – Navigate to the folder where you saved/extracted the torn paper brushes, and select them and click OK. This will load them at the bottom of your brushes panel.
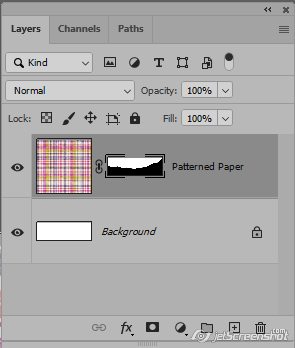
Step 5 – With the patterned paper layer active, click the mask icon at the bottom of the layers panel to a layer mask to this layer. After adding the mask, your Layers Panel should look like this:
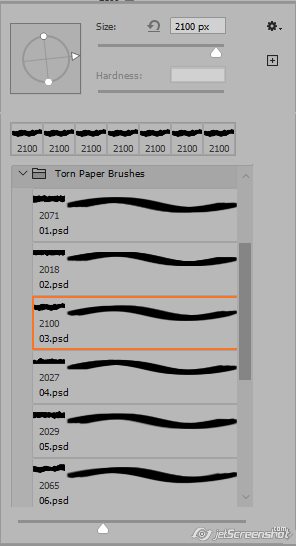
Step 6 – Click on the brush tool and select one of the Tricorn Torn Paper Brushes. I used 03.psd (2100).
Step 7 – Click on the layer mask on the Patterned Paper Layer. Make sure black is your foreground color, and begin tapping the brush on the mask to mask out part of the patterned paper to create the torn edge. Be sure to rotate and flip the x & y axis of the brush regularly so you don’t end up with a repeating pattern on the torn edge. You don’t have to rotate the brush too much. Here’s a sample of my brush panel:
When you finish masking out part of the patterned paper to create the torn edge, your layer panel will look like this:
Your actual file will look like this with the white background showing:

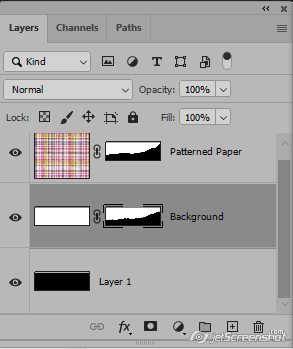
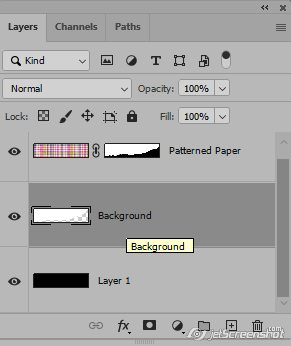
Step 8 – With the background (white) layer active hold alt and click the layer mask icon at the bottom of the layer panel. This will add a layer mask that is filled with black & completely hides the white layer. Don’t worry, I’ll explain why we’re doing it like this in a minute. Your layer panel should look like this – the background is completely transparent now:
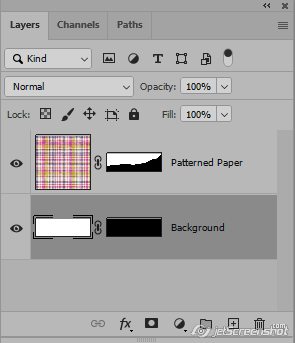

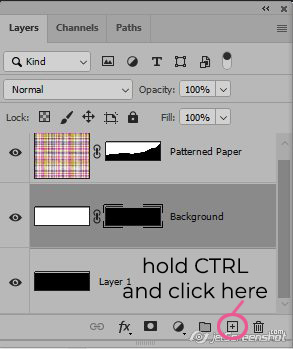
Step 9 – The transparent background can make it a little harder to see the white edge, so before I started revealing the white edge, I just created a new layer below the white layer, and filled it with black. There are loads of ways to create a layer. I just hold CTRL & click the add layer icon in the layer panel (holding CTRL creates the layer below instead of above your current layer. If it doesn’t end up in the right place, just drag it to the bottom layer.) If your white/Background layer is locked, double click on it to unlock it, then add the new layer using the steps above). Having the black fill will make it a lot eaiser to see the white torn edge as we create it. So, here’s what your layer panel will look like (minus the text I’ve added, of course *grin*):
Step 9 – Click the layer mask on the white/background layer. (see above image)
Step 10 – Select the brush tool from the tools panel again. Click on the brush in the top menu and select one of the Torn Paper Brushes again. You can use the same brush, a different one or even change it while you’re creating the white edge. It doesn’t matter. The white paper that shows along the torn edge is not meant to “match” the tear on the patterned paper. So don’t stress about this. We’re going to do some brush work again, and just create that white edge along the tear.
Step 11 – Set your colors to default black & white (just hit the D on your keyboard). Set your foreground color to white. If it’s not, click the arrows by the color swatches to switch the white to the foreground or just hit X on your keyboard.
Step 12 – Tap on the mask on the Background (White) layer (lol, don’t get this confused with the black layer we put in just to help us see the white edge *grin*) Begin tapping your brush on the mask on the background layer to reveal the white edge. You want to just reveal a very thin strip of white along the tear, but you do want it to vary in thickness so it looks more natural. You may need to reduce the size of your brush & make sure you rotate and flip the x and y axis as you work. You’ll want most of your brush to be behind the patterned paper so that you’re just revealing a narrow white edge beyond the torn edge on the patterned paper. Make sure your edge isn’t even or perfect. No stress…just start tapping, rotating, flipping and tapping that brush again.
Here’s what my torn edge looks like so far. You can see that I have a couple of problem areas. I’ll reduce the size of the brush and go back in and clean them up and get rid of that thick edges, especially that one on the right.

Step 13 – If some of your edge needs to be reduced or cleaned up a bit, just switch your foreground color to black, click on the layer mask on the background (white) layer and tap with your brush again to remove some of the white edge. I switched between black (to hide) and white (to show) over and over until I was happy with how the edge looked.

Step 15 – If you’re positive that you don’t want to make any more changes to your torn papers, you can right click on each mask and click Apply Layer Mask. That makes the changes you made on the mask permanent on the layer. If you’d rather keep the layer mask live, that’s fine, too.
Here’s what your layer will look like after applying the layer mask:
(I’m actually keeping my layer masks live on my file so that it will be easy to make changes if I decide to):
Step 14 – Now, you can delete the black layer and crop the file to fit the torn paper. Just to make things a bit easier to see on the finishing steps, I placed a piece of coordinating solid paper in the file and placed it behind the torn edge.

Step 15 – The file looks pretty good as it is, but we all know that paper isn’t perfectly “flat” looking. So, I applied a texture to my white torn edge using a Pattern Overlay. I have a kraft texture that is my go-to overlay for things like this, so I thought I’d share. I’ve created a .pat file so you can apply it as a pattern, but also have a jpg file that you can use. PSE users will need to use the jpg, and just set your layer style and opacities to match those in the image below. You can download the textured paper & .pat file here. So, here’s how I did it:
- Apply the pattern overlay with the following settings (if you can’t use photoshop .pat files, just drag the jpg into your file over the white torn edge and use the same settings I’m using for the pattern overlay:
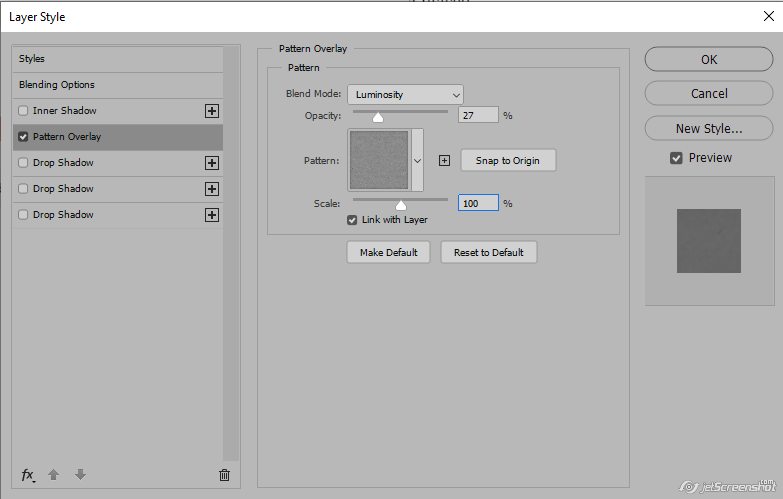
- You’ll notice that this makes the white edge look gray. DON’T PANIC. You have to add a bit of gray to it to make the texture show up. It looks okay like it is, but we’re going to brighten it up just a little
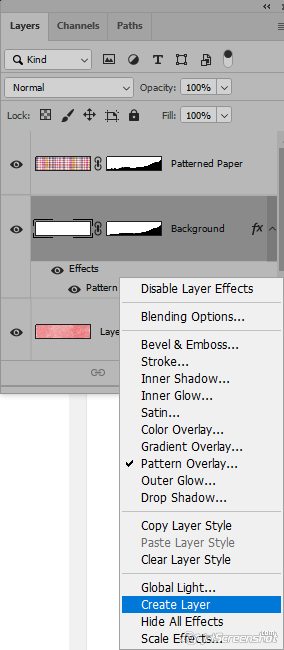
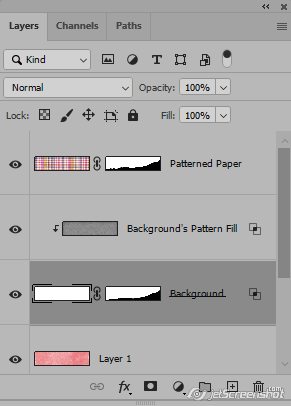
- Duplicate the overlay and apply a different layer style to it to lighten it up a bit. The first thing you’ll need to do is put the patterned overlay on it’s own layer (PSE Users will NOT need to do this since your overlay is already on its own layer). Photoshop users, right click on the layer style/Pattern Overlay below the white torn edge. It will pop out a menu box. Select Create Layer as shown in the image below. It will automatically be “clipped” to the torn edge layer when you create the layer.
When you’ve moved the Patterned Overlay to its own layer, your layers panel will look like this:
Step 15 – Duplicate the Pattern Fill Layer. You can just hold the ALT key and drag the Pattern Fill Layer down; or, you can right click and duplicate the layer. Once you have the layer duplicated, select the top instance of the Pattern Fill Layer and adjust the layer style settings to those shown below:
This helps brighten and define the texture on the torn edge layer….but it’s still not quite there yet.

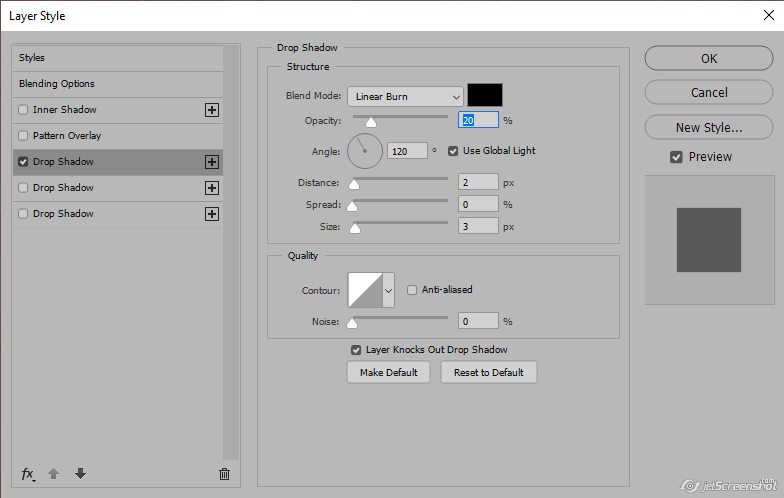
Step 16 – Apply a very small shadow to each layer. Here are the settings I used. For the patterned paper layer, I used a TINY shadow. I like my light source coming from the top, left; so I set the Angle at 120. You can set it at whatever angle you like to use.
The shadow isn’t much bigger for the white torn layer. I’m going to play around with this shadow a bit in a minute. But for now, here are the settings I used:
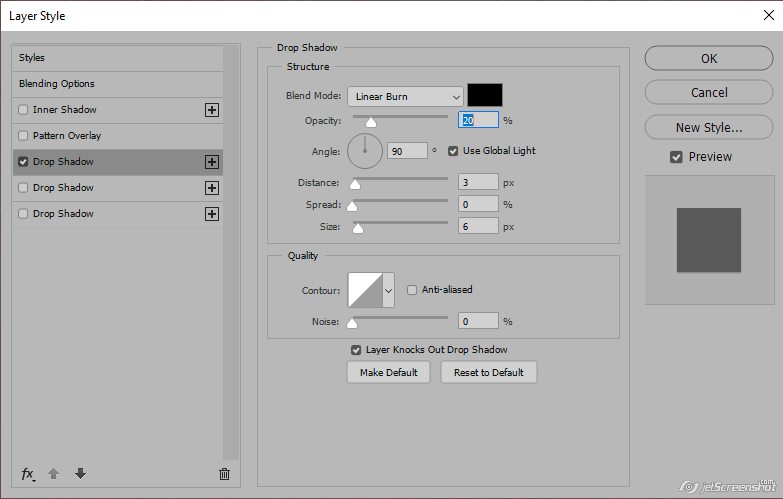
Here is the shadowed file with the settings above. But, you know I can’t just leave it like this, right?

Step 17 – I needed to bump it up just a little bit. I put the shadows on their own layers so that I could customize them.
Step 18 – Use the Smudge Tool to warp the shadow lightly (you can also use CTRL T/Warp, but I nudged it such a small amount, I used the smudge tool instead).
I love making it look like it’s lifting just a bit more here and there…..and here’s the final result…just the tiniest warp of the shadows make it look so much more natural:

The beauty of building them like this is that you can clip any patterned or textured paper to your top layer, and you have a new paper tear! You may need to adjust the opacity of the shadow layers to fit your papers…but hey, that’s an easy adjustment.


Phew…..and that’s it! I hope you enjoy this tutorial and that we start seeing torn papers on lots of layouts in the gallery!









LC said...
on April 7th, 2020 at 11:42 am
Thank you for the tutorial. Most authors who create these tutorials include a PDF file for one who wishes to download the tutorial to use while offline or when the internet is down.
admin said...
on April 7th, 2020 at 12:10 pm
Ooops, I have the pdf done. I just forgot to link it. Lol, chasing a 3 year old granddaughter is making me a little less focused. I’ll get it linked for you!
GammaNonna said...
on April 7th, 2020 at 1:58 pm
Can you tell me where to get this brush? I could not find it…… Thank you!
admin said...
on April 7th, 2020 at 3:21 pm
The brushes are in a link below the video (you have to click on SEE MORE to access the link. But, I’ll make it easy for you. Here’s the direct link: https://www.deviantart.com/art/Torn-Paper-Brushes-178409431
Enjoy! ~ Fayette
Schnuppe said...
on May 23rd, 2020 at 4:20 am
ich mag solche Tutorials wo man wirklich das richtige Scrappen erlernen kann,danke für deines liebe Paula