Tipster Tuesday: What Not to Do #1
I’m no expert scrapper, and by no means any kind of judge and jury, but there are some things that just don’t look good on a page & others you just flat out don’t do. I have seen people squish their photos up & distort them, just to fit the frame.
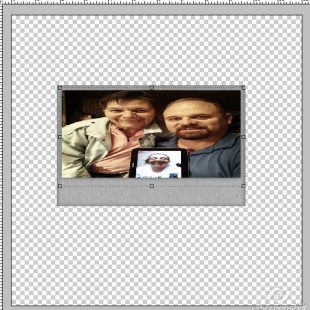
Like this:

Or this:

Why? Why would you do that? I don’t understand it. You can’t even physically do this with a paper photo, so why would you do it digitally?
Think of it as sticking an actual for real live paper photo into an actual for real live photo frame bought at the local store.
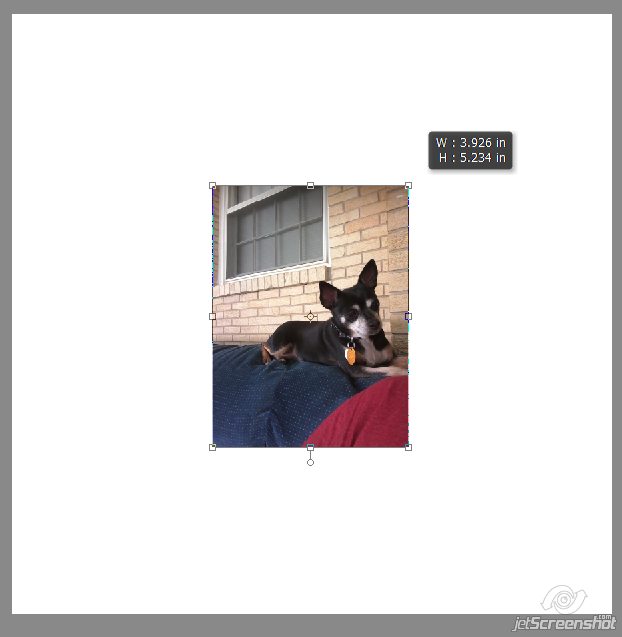
Here’s the photo I’m working with. It’s pretty big – my BIL has an excellent camera on his phone apparently, lol

First lesson… keep your photo in proportion. In PS, you can do that by making sure the width and height of the photo size is linked:

and drag a corner down:

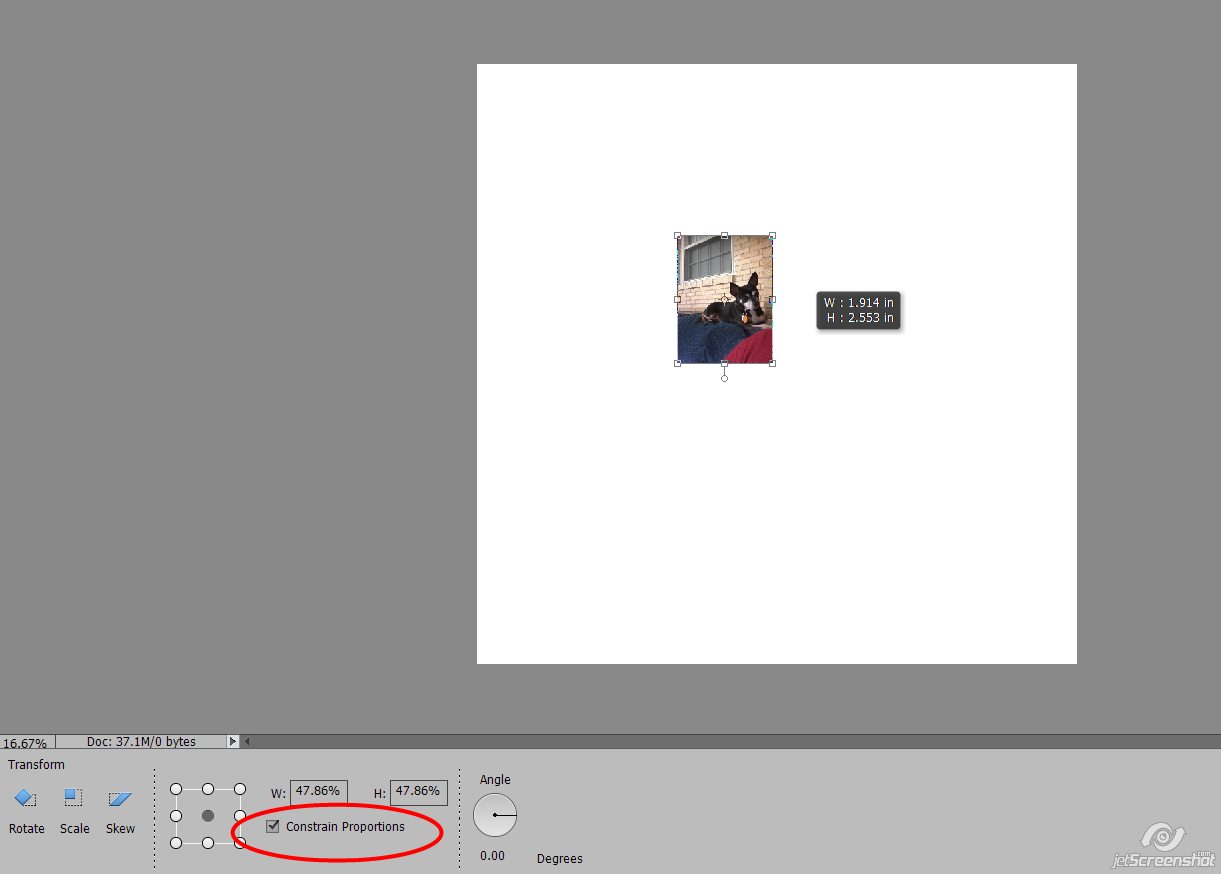
You can also click on a corner to bring up the resizing box as shown above, hold the shift key (if you are using an older version of PS) and then drag a corner down to resize it. It will stay in proportion and won’t become squished and distorted.
If you are using PSE, click on the bounding box to get the resize started and you should see a constrain proportions checkbox. When checked, your photo will stay in proportion.
When I’m scrapping, I make a “blank” spot where the photo would go. Put a new blank layer between your photo and frame. Then touch touch the magic wand inside the hole of the frame:

Expand the selection by 10 or 20 pixels (depending on the size of the frame)

And then fill the spot with white on the new layer (or any color will do really, it doesn’t matter) & deselect.

Now I can clip my photo to that shape…

… and see how it looks in the frame while I’m resizing it:

You can do this on templates too… clip your photo to the photo spot and resize it while it’s clipped so you can see how it will look on your page:

With smaller photos, don’t resize the photo to fit the frame – resize the frame to fit the photo:

When you stretch out smaller photos like I did in the middle there, the photo becomes grainy and crappy and icky and totally not print-worthy.
I hope this little tutorial will be useful to some of you. I’m not pointing fingers and I’m not judging and I don’t want anyone else pointing fingers or judging either. Maybe your a beginner scrapper, or maybe you like your photos stretched & distorted for some I-really-can’t-see-why reason? If so, please enlighten me because I am clueless and I will admittedly stand corrected for the world to see 😉
Glori said...
on June 4th, 2019 at 11:27 am
Are you using PS and not PSE? I got lost on the first recommendation. I do not “squish” my photo but I was thinking maybe I’d learn something that works better than what I do do…in resizing the frame or at times kinda remaking the frame size to fit my photo.
Barbara Hewitt said...
on June 4th, 2019 at 12:16 pm
Is this for PS only? I am not finding things, like the icon for linking the H & W, of the photo in PSE 2018. Thank you.
admin said...
on June 4th, 2019 at 2:20 pm
I updated the post for PSE users, sorry about that! Those of you using PSE have a “constrain proportions” checkbox – you can see the H & W right above that. Make sure that’s checked to keep your photo in proportion 🙂
PiCKLEBERRYPOP » Tipster Tuesday – What NOT to Do #3 said...
on July 30th, 2019 at 12:01 am
[…] ago about not stretching or “squishing” photos to fit a frame. You can see that tip here. I’d like to follow that up today with a similar […]